How to Apply Simple Wall Decals: A Step-by-Step Guide
Simple Wall Decals are a new range of wall stickers by Rocky Mountain Decals, made with high-quality removable wallpaper fabric. These trending 2025 designs are perfect for kids’ rooms, nurseries, playrooms, and more. These minimal outline-only decals are color customizable (Navy Blue is a bestseller!) and adds a playful, modern touch to your wall.
Not sure how to apply them? We’ve got you!

Wall Decal Design: Simple Vehicle Decals
Step 1: Cut Out Each Decal
Start by cutting out each individual decal from the sheet. This allows for more flexibility in layout and spacing before applying to the wall.
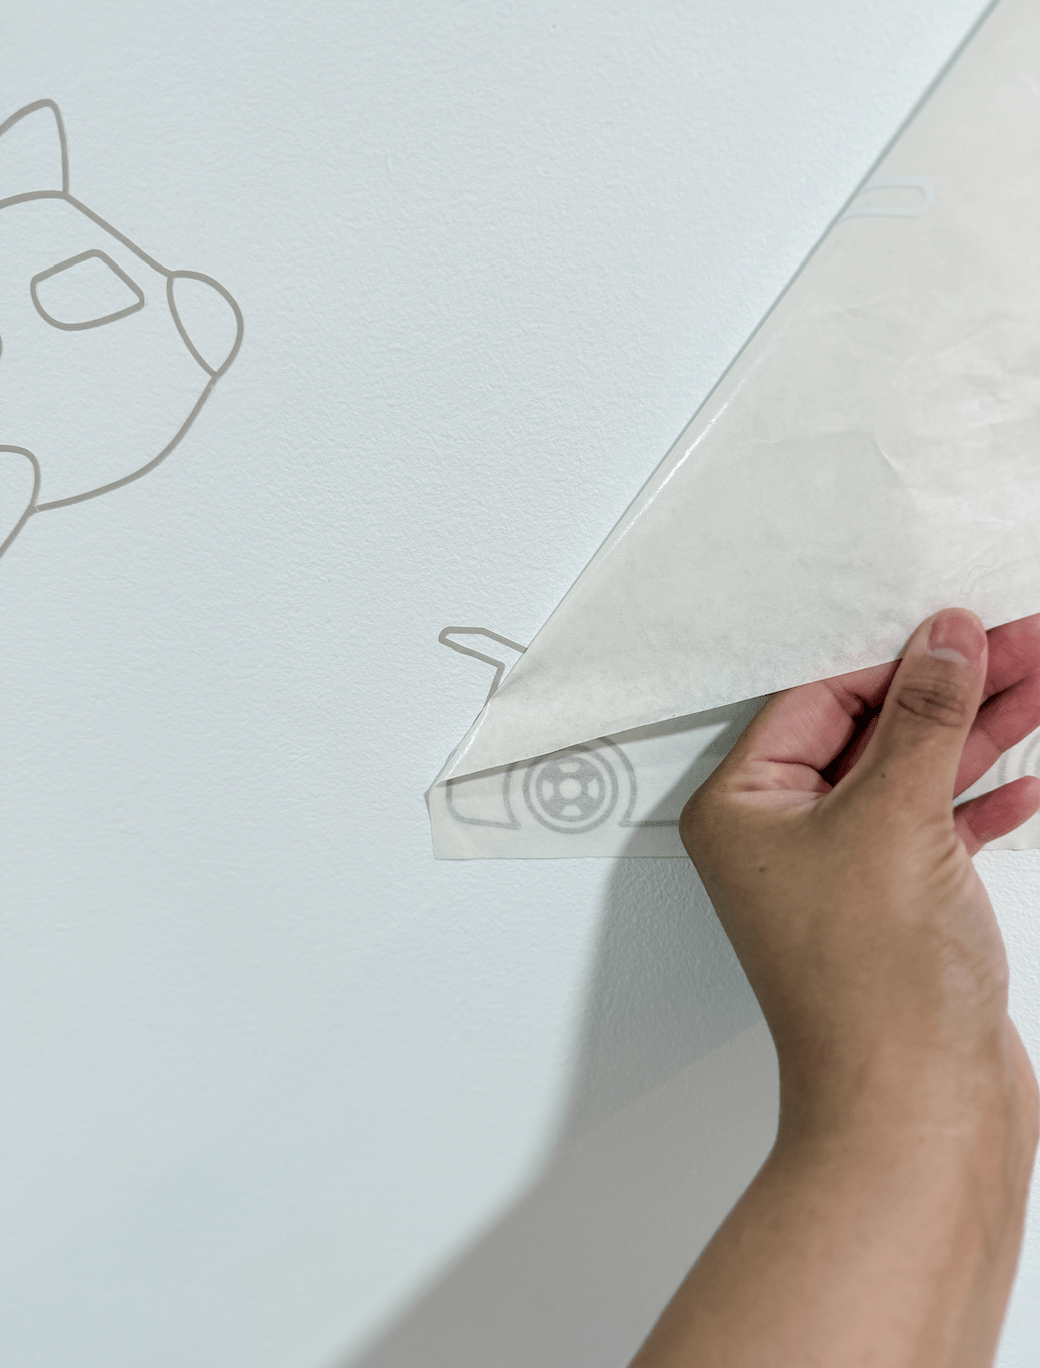
Step 2: Peel Off the Protective Backing
Before removing the backing, you can use your application squeegee to press over each decal to ensure it’s fully adhered to the transfer paper. Then, slowly peel away the white backing paper to reveal the adhesive side, making sure the entire decal lifts cleanly with the transfer sheet.

Step 3: Place the Decal on the Wall
Position each decal where you’d like it to go. You can lightly place it and adjust as needed before pressing down firmly.
Step 4: Rub the Decal with the Applicator Tool
Use the applicator tool included with your order to firmly rub over the entire decal several times. This helps ensure it's fully adhered to the wall and prevents any lifting when you remove the transfer sheet.

Step 5: Carefully Peel Off the Transfer Paper
Slowly peel back the transfer layer at a sharp angle, keeping it as close to the wall as possible. This can help the decal stay in place as you remove the sheet. If any part lifts, simply lay the transfer back down and rub over that area again with your tool or fingers

Wall Decal Design: Simple Vehicle Decals
Step 6: Smooth by Hand
After the transfer layer is removed, gently go over the decal with your hand, or squeege to smooth out the decal, ensuring it is fully adhered to your wall.
Optional: Plan Your Layout First
You can cut out each decal and use painter’s tape to preview the placement on your wall before committing. This gives you a chance to play with spacing and layout until you love the look.
Final Tips
- Make sure your wall is clean and dry before applying decals.
- Wait at least 4 weeks after painting to apply decals.
- Decals work best on smooth surfaces like painted drywall, glass, or mirrors.

Applying wall decals is a fun, easy DIY project that can transform your space in minutes.
Looking for a custom color? Browse our full color chart, or contact us here if you'd like something different.
